


Choosing the right CPU and motherboard is one of the most important things to do when building or upgrading a PC. The two need to operate properly together so that the system runs smoothly, is stable, and can be upgraded in the future. This blog will show you how to check for motherboard compatibility, pick the best motherboard CPU for your needs, and install it safely on the motherboard.
Once you know your motherboard’s make and model, visit the manufacturer’s website and look for the “CPU support list” for that model. This list will list CPU compatibility and BIOS versions. Use a motherboard compatibility checker online or check your computer’s BIOS or UEFI settings during startup to identify the motherboard’s chipset and socket type, which are vital for compatibility.
1. Find your motherboard
Check Motherboard: Look for ASUS, Gigabyte, or MSI and the model number on the motherboard.
System Information Software: Use Speccy or your BIOS/UEFI settings to find this information if you can’t see it.
2. Check the motherboard CPU support.
Visit Manufacturer’s Site: Go to the manufacturer’s help page using the model number.
Find Support List: Search “CPU Support List,” “CPU Compatibility,” or equivalent sections for your motherboard model.
Review requirements: The list will show all processors compatible with your board and their BIOS versions.
3. Check CPU Compatibility
Type-match sockets: The CPU’s socket (AM5, LGA 1700) should match the motherboard’s.
BIOS Version Verification: To support the desired CPU, upgrade your motherboard’s BIOS. Newer CPUs generally require updated BIOS.
Examine the Chipset: Different chipsets support different CPU generations on the motherboard.
Installing a CPU requires care and accuracy. A single pin bend or misalignment could damage the CPU and motherboard.
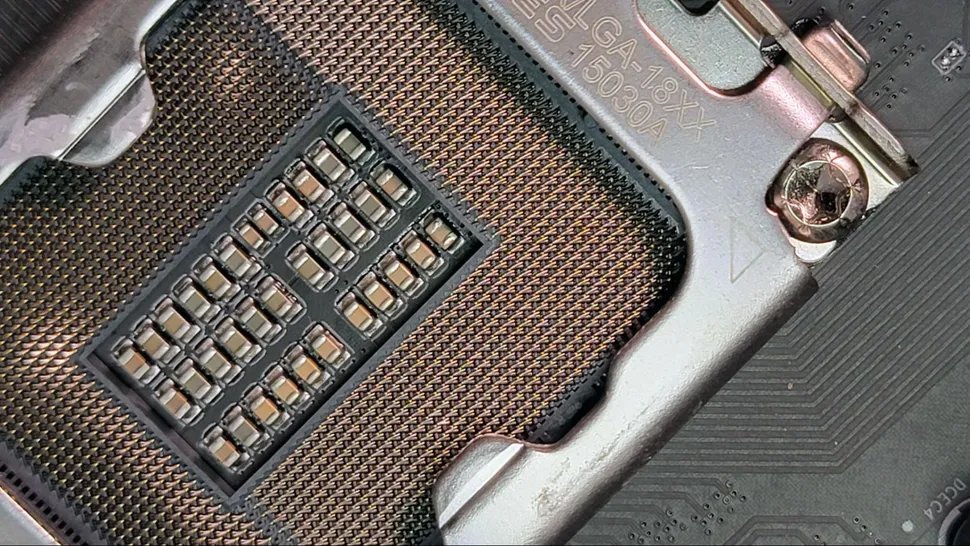
1. Find out what kind of socket you have
AMD AM4 (PGA) has pins on the CPU, while AMD AM5 and Intel use LGA sockets on the motherboard. Be careful with both parts and don’t touch the contact points.
2. Prepare the workspace
For safety, the CPU should be put in the case before the motherboard. Put the motherboard on a flat, non-conductive surface, like the box it came in. Grounding stops static discharge.
3. Open the CPU socket
To open socket covers, lift the retaining arms or locks. Leave the plastic socket shield on. It will come off after you put in the CPU.
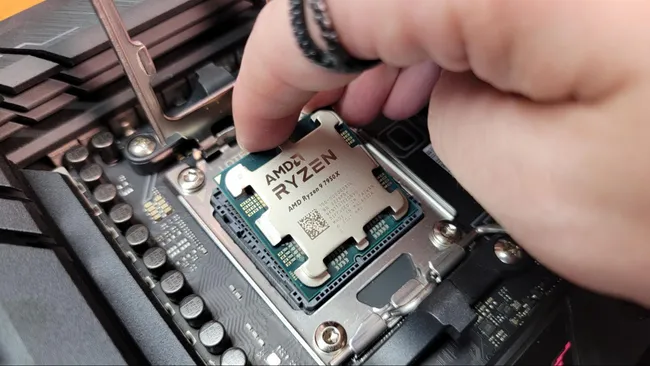
4. Make sure the CPU is in the right place.
Align the small gold triangle on the CPU with the triangle or marking on the socket. Carefully line up the chip—never push it.
5. Put the CPU in Softly
Without pushing or slipping, lower the CPU into the socket while holding its edges. If the chip is lined up correctly, it should settle smoothly.
6. Protecting the CPU
Click the retaining arm and put the metal bracket down. Resistance may happen normally. When the lever is locked, the CPU installation is done.
Put thermal paste on the CPU cooler and then finish building your PC.
Before taking out a motherboard CPU, turn off the computer and touch a grounded metal object to get rid of static electricity. If you need to, twist the thermal paste seal to loosen it and take off the CPU cooler. Finally, lift the retention arm to free the CPU socket, and then carefully lift the CPU by its edges to avoid damaging the pins.
1. Get your workspace and tools ready
Shut down your computer and unplug it.
Before touching any of the computer’s internal parts, touch a grounded metal object, like the computer’s chassis, to avoid static discharge.
Get the tools you need: you might need a screwdriver for CPU coolers.
2. Take off the CPU cooler
Find the power cord for the CPU fan on the motherboard and unplug it.
Unlatch the cooler: Intel and AMD CPU sockets have levers or arms that hold them in place. Gently pull this arm to free the cooler from the mounting bracket or socket.
Loosen Seal: To break the seal between the heatsink and the CPU thermal paste, turn the cooler a little bit to the right and then to the left.
Carefully pull the CPU cooler away from the CPU.
3. Take out the CPU
After taking off the cooler, raise the CPU socket retaining arm to 90°.
Gently lift the CPU out of the socket.
Handle with care: Take care when handling CPUs, especially AMD CPUs with pins on the bottom. Don’t bend the golden pins on AMD CPUs, or it will be hard to put them back in.
A multi-core CPU can run on any motherboard made in the last 15 or so years. A CPU with several processor cores is known as a multi-core CPU.
A multi-processor motherboard has several CPU sockets; they are typically quad socket boards or dual socket boards, as shown in the figure.
When a single CPU’s core count is insufficient to complete the work at hand, motherboards with multiple sockets are utilized. The current maximum performance of an x86 CPU (which includes all CPUs sold by AMD and Intel) is 64 cores (128 threads). What should you do if you require more? several sockets, and if that’s not enough, you purchase as many of them as you can fit in a rack.
Mainstream platforms top out at 16 cores (32 threads)—AMD (3950x, 5950x, 7950x – 3generations of CPU without AA core count increase) or 24 cores (13900k) Intel. While most software you will use for home computing doesn’t really need a lot of cores, it’s better to get fewer faster cores than many slower cores (due to power and heat considerations it’s not possible to have a ton of fast cores).
The motherboard links all computer components. From RAM to USB ports, it includes hookups for almost everything. Connecting these components lets them interact so your computer can accomplish what you want.
Most motherboards today have chipsets, specialized integrated circuits. They contain controllers and bridges that allow CPUs, GPUs, RAM, ROM, and more to communicate, manage power, and govern boot orders. Intel Z87, AMD A58X, and Nvidia NVMe M2/M3 chipsets are familiar.
Knowing your processor model is essential for CPU upgrades. Due to CPU incompatibility, you must also know the processor speed. Before upgrading, you must discover a compatible CPU that meets the speed requirement and buy it.
CPU compatibility with your motherboard depends on processor brand, socket, and chipset. Using the table above, you can see which generation of AMD and Intel CPU is compatible with each of these things.
ShiMeta provides embedded motherboards and CPU solutions designed for commercial and industrial applications with long-term reliability.


